I built my son a camera
It is early 2026, the days are dark, my mood is down, I’m tired all the time11 Mostly due to a diagnosed but, at that time, not yet treated case of severe sleep apnea., my kids are about two and a half years and six months old and time for myself is nowhere to be found. All I can think about is spring, warmer and brighter days, and my parental leave that starts in May. Our goal is to travel with the kids. So in hopes of lightening my mood, I looked for nice maker projects I could work on in my limited spare time. And while I was browsing AliExpress, I came across a dev board with a touch display and the option to connect a small camera via a ribbon cable. Instantly I was thinking about building a camera for my son with it. A quick talk with my wife confirmed the obvious: first, he was too young to understand, let alone control, a camera of his own, and second, there are super cheap kids’ cameras available online for about the price of the touch display module alone.
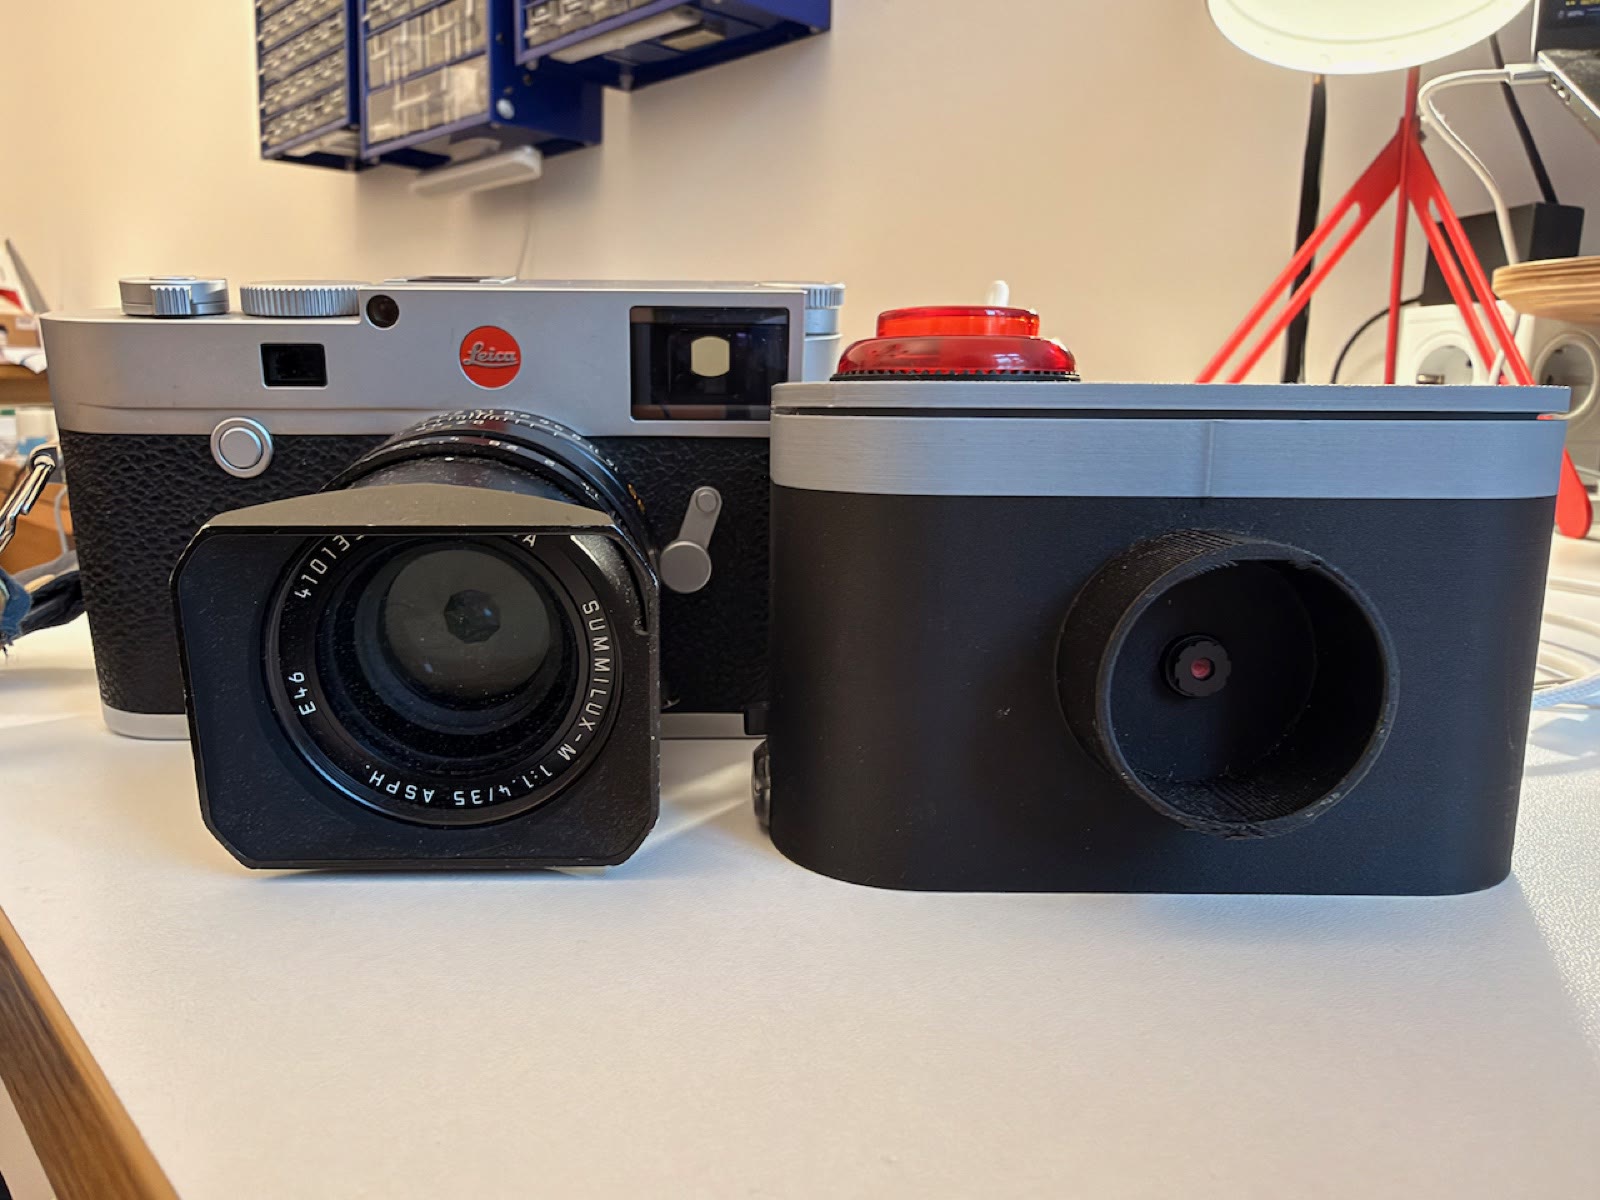
So for me the case was clear: I would build a camera that was so easy to use that our son could take lots of travel pictures, and I would build it for such a low price that one could not buy more than three or four of these cheap kids’ cameras for the same price. My wife is a hobby photographer and she owns a really marvelous Leica camera that has a simple rounded black body with silver on top. I thought to myself: “The simple but elegant design perfectly supports my limited ability to do CAD22 Computer Aided Design: it’s the witchcraft-like interface used to design things that should, at some point, live in the real, physical world, like kids’ cameras.!” So I tried to envision my son using a simple camera with a touch screen and pretty quickly came to the realization that I needed some more physical, non-touchscreen hardware. So while browsing AliExpress again, trying to get some strange combo deal discount, I found arcade buttons, and it instantly became clear in my head: a big red arcade button at the top that basically screams PUSH ME!. A physical flip switch could serve as a mode switcher between shooting photos and looking at them. I named it PotatoCam, for reasons that will become painfully obvious further down.
So for the next ten or so weeks, each Wednesday evening, when my wife was at her sport, I would sit beside our baby daughter sleeping33 By which I mean: NOT sleeping. in her baby hammock and design and build the camera. During the days I would catch myself planning what I would do next Wednesday evening, and my mind was in full-on hyper-fixation mode. In the end, I finished the project just before we went on vacation and proudly gave it to my son, who took over 500 photos in the next two days44 Not exaggerating.. Then we left for the trip I had built it for, and he promptly lost interest. So the camera I built for travel photos mostly documents the inside of our apartment. In great detail, and with motion blur. Still, I love getting to experience his view of the world through the photos he has taken.
What’s inside?
Loading drawing…
- Body (PLA, black + gray · 103 × 52 × 60 mm): Black at the bottom and gray on top, like my wife’s Leica. The resemblance ends there.
- “Lens” (Ø 34 mm · hollow · purely decorative): There is no glass in here. The real camera sits flush in the front wall at the back of the ring, so the ring is mostly there to tell people which end to point at things.
- Top plate (PLA, 3 mm · hex cut-out for the button): Sits in a lip on top of the body. It is the only way in, so everything inside had to go in from the top. Semi-permanently attached via a two daps of hot glue.
- Shutter button (Arcade button, LED-lit · Ø 33 mm): The reason this camera exists. It glows red, it clicks, and it survives being hit at full toddler speed. Go on, click it.
- ESP32-S3-Touch-LCD-2 (ESP32-S3 · 2″ IPS, 240 × 320 · ST7789T3 · CST816D touch): Screen, touch and microcontroller on one Waveshare board. It is mounted sideways (landscape), which the camera did not agree with.
- Mode switch (Toggle switch · shoot / view): Flips between taking photos and looking at them. The board had no pins to spare, so it shares GPIO 18 with the shutter button through a 10k/22k resistor ladder, and the firmware tells them apart by voltage.
- OV5640 (5 MP sensor · used at 0.077 MP): Five megapixels, of which I use 320 × 240. More on that below.
- Camera cable extension (24-pin FPC · with a 90° twist): Camera and display are rotated 90° against each other. Rotating every frame in software cost frame rate, so the cable got longer and twisted instead. Together with the SD card’s ribbon it now forms a knot nobody will ever untangle.
- SD card (Full-size SD · 16 GB): Full-size, not micro, because a microSD card would have been lost instantly. By a certain someone. (Put the camera back together and select me.)
- SD socket (SD extension · push to eject): An extension: a full-size socket on one end, a ribbon cable into the board’s microSD slot on the other. Glued in with PVA glue, and it has a really satisfying push-to-eject mechanism.
- Battery (LiPo · 2000 mAh): Lies flat on the bottom, held down with hot glue and PVA glue. It lasts a long time. The battery indicator is less reliable: the spike when it takes a photo resets the camera before the battery has actually run out.
- Power switch (Slide switch · on / off): An ordinary black switch that cuts the cable from the battery. Which means the camera has to be switched on to charge. Impeccable design.
- USB-C port (Transparent USB-C socket): Wired straight to the board, which has the charging circuit built in. The whole connector is see-through and glows bright green when you plug a cable in. (Put the camera back together and select me.)
- Hot glue (Hot glue, some PVA · quantity: yes): Holds the display, camera, battery and USB socket in place, with PVA helping out under the battery and the SD socket. It doesn’t move in the exploded view, because it is the only thing that knows where everything goes.
- Wiring (Hand-soldered · no flux): I can solder. I just can’t solder well. No flux, so every joint is one giant blob of solder with several wires running through it.
The project is basically already 90% done with the Waveshare ESP32-S3-Touch-LCD-2, a 2-inch touchscreen development board with a microSD card reader and a battery charging circuit on board. The listing also already contained an OV5640 camera module that is capable of taking 5 MP photos. I pulled the trigger on a red arcade button55 It was a trackpad-shaped trigger, because the actual arcade-button-shaped trigger was, in fact, yet to be bought., one with an integrated LED, so it glows bright red whenever it has power. I added a microSD-to-full-size-SD extension cable to the mix in order to move the SD slot to the housing of the camera and to make the data storage medium less losable by little toddler hands. I threw in a 2,000 mAh LiPo battery, a regular old flip switch, and a USB-C connector, all of which I still had lying around. Because the dev board only had a single usable GPIO broken out, I had to use a resistor divider to tell the flip switch and the shutter button apart.
I enclosed it all in a 3D-printed case that was planned to be “simple and elegant” like my wife’s Leica, but it turns out my CAD skills are not good enough for that. So the only resemblance the camera has is a filament change from black to gray at about three quarters of the height and a red circle somewhere on the casing. One thing I added to the case to make it look a bit more like a real camera was a ring that is supposed to resemble a lens. It also has the added benefit of protecting the protruding actual camera lens a bit.
I topped it all off with about a metric ton of hot glue and a few dozen dabs of PVA glue. Accordingly, the camera falls apart every few days, but that’s nothing a bit of hot glue can’t fix for another few days.
Why is everything sideways?
My first tests were done with just the board plugged into my laptop and the OV5640 camera module attached to the board with its stubby ribbon cable. After writing the code to initialize the camera and shooting my first picture, I noticed something was off: the image was on its side. “Well, that’s nothing a few lines of image rotation code can’t fix”, so I rotated the image. But to my surprise that didn’t help much, because now the landscape touchscreen was showing a portrait photo. I tried cropping in, but the photo quality was rough anyhow as I was testing in the dark with my daughter sleeping beside me. Plus, it added a kind of zoom that is difficult to handle for tiny people. As far as I can tell, this is a real design flaw of the Waveshare board: out of the box, the camera module sits rotated 90° against the screen.
- Capture
- Rotate 90° + crop
- Draw
The camera sits turned 90° against the screen. You hold PotatoCam in landscape, but it sees a portrait slice of the world, and the screen shows it lying on its side.
So I tried bending the ribbon cable, but it was just too short, and I didn’t want to risk a broken ribbon. So I reluctantly ordered an extension cable, only to sit there a week later with two male ribbon cable ends that I couldn’t connect. A week later, a female-to-female adapter board solved this issue, and now I had not only the ribbon cable of the SD card extension dangling around, but also a contrived camera ribbon extension thingamajig. Together they formed a tight knot inside the camera housing that even the most experienced sailor would be proud of.
Toddlers don’t wait
When I finally had the whole camera assembled and was testing it, I was not happy. The viewfinder ran at about one frame per second, and taking a photo took way too long. So in another late-night session I reduced the resolution of the viewfinder to 320 × 240 pixels, which alleviated the choppiness, but now taking a photo meant switching from the low-res QVGA mode to the high-res 5 MP mode, grabbing a frame, saving it, and then switching back again.
Not live: ten photos my son took in a row, on a loop.
- Press the red button.
So the fix was to take the photos in QVGA as well. The ESP32-S3 handles that very quickly, and the viewfinder flashes white to let the artist know that his vision was captured. Once that change was made, I was much happier with the whole feel of the camera. However, I was quite sad that I had bought a 5 MP camera module and was now only using a tiny fraction of it. In the resulting photos, faces are barely recognizable and important details are just a heap of pixels hanging around in a corner. But then again, almost all of the photos my son takes utilize heavy motion blur anyway, probably for artistic effect.
Another good side effect of the 320 × 240 capture size is that a photo now only takes up about 6 KB. With my full-size 16 GB SD card, that makes for over 2.5 million photos that can be captured by tiny toddler hands smashing on the big red button and stored safely on flash memory. My calculations say that, at his current pace, the card will be full in about 30 years. In practice, I have to empty it long before that, because the ESP32 gets painfully slow at scrolling through more than a couple thousand photos.
- Photos taken
- 0
- Pace
- 2.0 /s
A reference pace until you press. Not a measurement of my son.
| At this pace | 5 MP | 320 × 240 |
|---|---|---|
| One photo | ||
| Fit on 16 GB | ||
| Card full in | ||
| Your photos |
Seeing that the first days with the camera resulted in over 500 photos reassured me that the QVGA mode was the right call. Sometimes I’m still sad, though, that the photos are not for printing or even looking at up close.
Through a child’s eyes
The photos on the SD card are an incredible window into how my son sees the world, and I love even the photos of the cobblestone sidewalk with maximum blur. You can just feel what was interesting or exciting to him in that moment, and that makes every pixely blur a masterpiece to me. When looking through all of the photos on the SD card, I noticed that his heavy use of the arcade button makes for an almost 90s-internet-GIF vibe.
photo_406.jpgLooking back, I’m not sure whether it was the Wednesday evenings, the spring or treating my sleep apnea that got me out of that winter mood. But I do know which of the three involved more hot glue. Ten weeks of building something with my hands, for someone I love, next to someone who was NOT sleeping, was the kind of tired I didn’t mind at all.
The camera still falls apart every few days, and the photos still won’t win any prizes. But every time I copy them off the SD card, I get a few hundred little windows into my son’s world: his toys, our apartment, the cobblestones on the sidewalk, all at 320 × 240 and with heavy motion blur. So, all in all, I highly recommend sketchy maker projects for your kids. And if my daughter ever asks for a camera of her own, I already know where to get the hot glue.